Ready to Visualize Your New Room?
A visualizer allows you to bring your floors or walls to the store so you get more information when you explore your options. You can easily see how your room looks with wood plank tile, with strong decorative tile patterns, and with elegant stone looks. You can even switch the direction of the installation, so you can decide which you prefer.
The Tile Outlets of America Room Visualizer makes it so much easier for your dreams to become reality!
What's particularly exciting is that you don't have to download any applications to your laptop or desktop or add any apps to your tablet or mobile device. All you need is an image of the room you plan on remodeling. It's that simple!
By the way, you'll notice that the instructions focus on visualizing new flooring. That's because the wall visualizer is a recent addition and only a few wall products are ready for visualizing. It's a work in progress!

Step 1 - Select any flooring product from the Tile Outlets of America website
When you browse through flooring products (floor tile, stone patterns, and LVT) and/or wall products in the product catalog, look for "See This on My Floor" and click on the product image.If you scroll down this page, you'll find pre-selected products so you can explore and experience the Visualizer.
Step 2 - Upload a photo of your room or pick a room scene
In terms of rooms for visualizing product, you have options.You can select one of the room scenes available within the tool OR (and this is where it gets really fun!) from your digital device, snap a photo of your room and view it in the Visualizer.If you're on a desktop, you can simply upload an image from your hard drive into the Tile Outlets Visualizer.
Tips for success:
.. Select an image that is at least 500KB and no larger than 5MB.
.. Pick a photo where 2/3 represents your flooring (vs. furnishings).
Step 3 - See our flooring products in your room in seconds!
Just like magic, you'll see the flooring product you selected in your room!You can easily change products so you can compare and decide which you prefer. You can also change direction of the installation.
>> Note that you can choose Walls as well as Floors in some circumstances. It's a dropdown option.
Explore the Visualizer!
Click on one of the products below and you can experience the Visualizer. See for yourself how these products look in your own room.
Visualize these Floor Products
Visualize these Wall Products
Visualize these Large Gauged Porcelain Panels
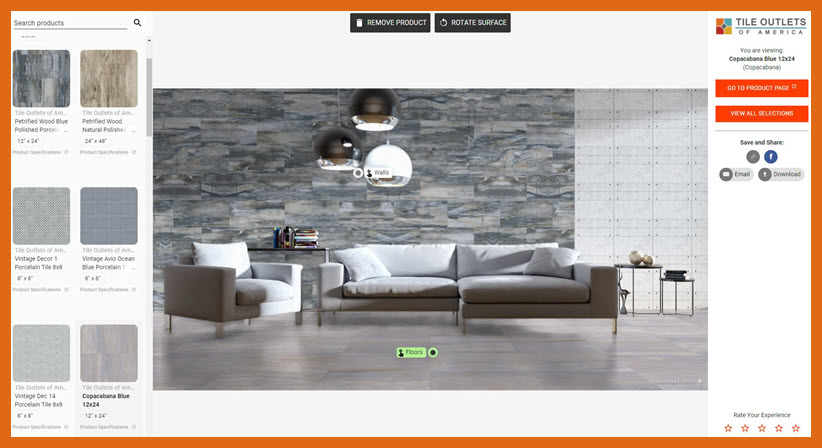
A Visualizer Example
In this example, you see a room scene where both the floor tile and wall tile have replaced the original materials. Notice the green 'Floors' button on the floor tile; that indicates that you are working on floors and can select other products from the left sidebar to visualize.
At the top, you have the option to rotate the surface.
To activate the wall tile option, click on the 'Walls' button in the middle of the wall scene; it will become green and you can experiment with other products.