

How New Tile and Cabinets Transform 1938 Bathroom
Posted by TOA's Blog Team on Oct 24th 2025
If you're wondering how new tile and cabinets might transform a bathroom from 1938, you'll love this bathroom remodel story! It comes from Michelle Slobodzian in the Fort Myers store.
You can learn more about Michelle in this article: Tile Outlets' Kitchen and Bath Cabinet Expert: Michelle Slobodzian.
Reimagining a 1938 Bathroom With New Tile and Cabinets
TOA: Michelle, please tell us about your original bathroom.
MS: Our home was built in 1938, and we adore all of the character and charm that it has to offer.
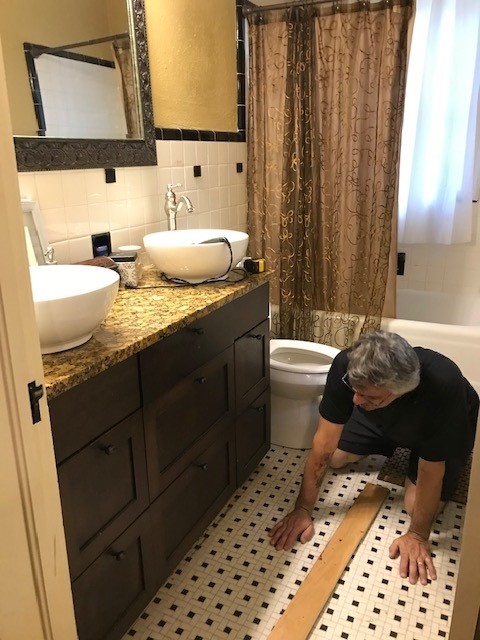
We’ve lived here 18 years and our master bath was the only room in the main house that we hadn’t done much to other than replacing a really short vanity many years ago and adding a double sink. The master bath is small.
TOA: Why did you decide to remodel your bathroom? Were you addressing a specific problem?
MS: We had a leak in the pipe in the wall. Our walls are plaster and lath, and we knew it was going to be a task to open them up to work on the plumbing. We decided to take the opportunity to redo the whole bathroom to make it more functional.
The tile was original but had cracks and chips that were there when we moved in that couldn’t be repaired.
We removed the tub that we never used in order to enlarge the shower and make it easier to get in and out of as we get older.
The second sink that we had added previously was not necessary. Storage was more important in our little 5’ x 9-1/2’ space.
The window in the shower is also original to the house. It was always a nuisance having another shower curtain hanging over it to protect the wood window and trim.
TOA: What did you decide to do and with which products?
MS: Our solution for the window was to remove the trim and tile up to and around it. Then we added a thick tempered piece of frosted glass for privacy.
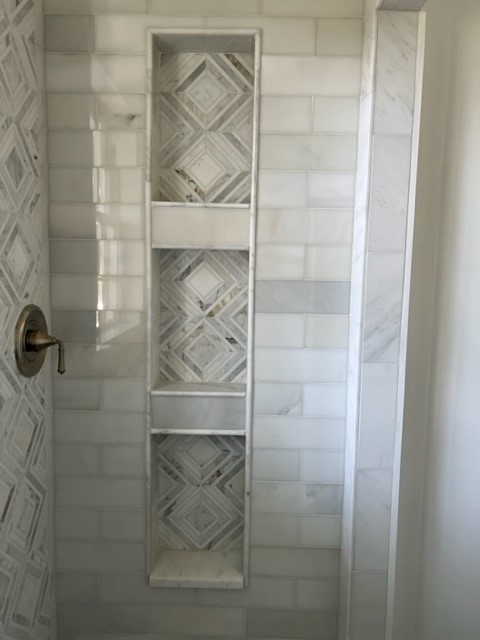
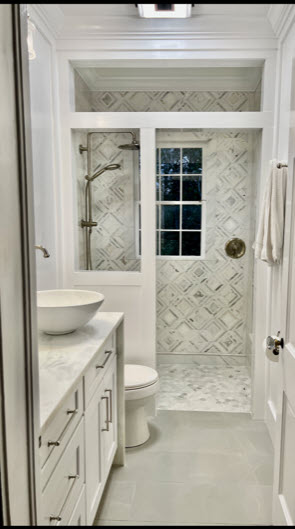
I love frameless shower doors, but I felt that the look across the whole shower was too modern for our home. We built a wall (see images below) and completely tiled it to add some character, knowing we were going to do floor to ceiling wainscotting in the rest of the space.
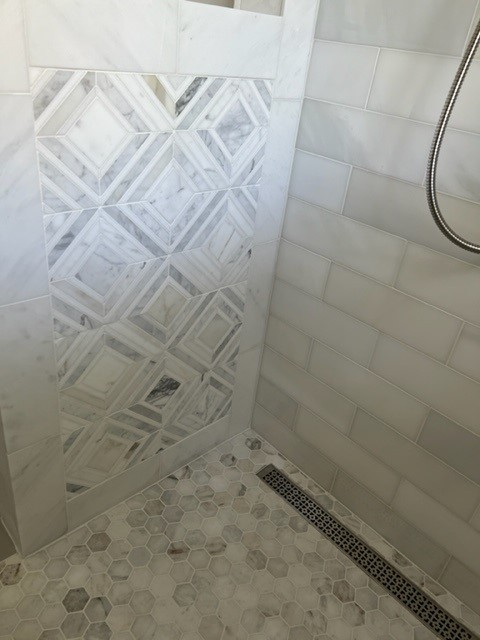
We chose to do polished marble tile in the shower for a timeless look and tiled up to the 9’ ceiling for a little added drama and to make the small space feel larger.
The floor tile is a warmer tone of taupe gray with some white veining to anchor the space and transition between the marble in the shower and on the countertop.
We chose Forevermark for the cabinetry because they offer the cabinet you see in the last image below that sits on the counter with drawer space, and we like the quality of their product.
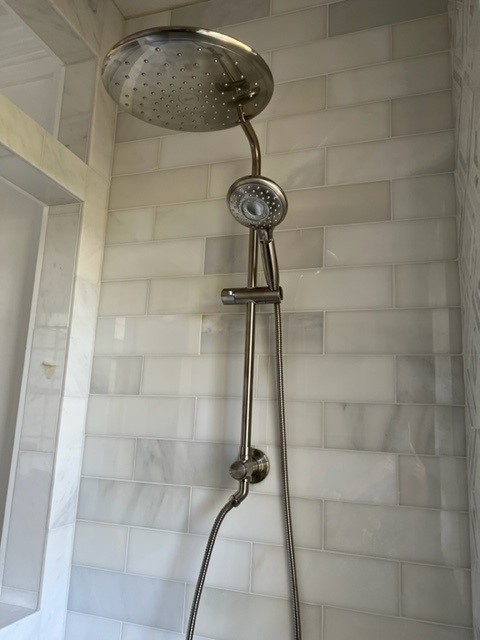
I used a polished nickel finish for most of the hardware and fixtures. It’s a warmer finish than chrome and adds a hint of glamour to the mostly white space.
The cabinet pulls we ordered from the Top Knobs/Atlas Homewares Victoria collection are the perfect complement to the overall design.
TOA: What tile did you use for this project?
MS: The floor tile is 11” x 22” Moon Bryd Light Grey porcelain.
The walls are polished 4” x 12” Statuary Carrara White marble subway tile.
The shower floor is a small polished marble hex. We were concerned about that choice, but it is not slippery at all.
>> Shop mosaics
I wanted a stack of wall niches with the lowest one being a good height to lean on to shave my legs. We didn’t have the space or accessibility to create a bench, and shaving is an often-overlooked need in a shower.
We used a pencil detail to trim the niches that created the perfect finishing touch. The pencil we used is a Carrara White Polished Marble 12”.
TOA: Did you encounter any surprises during this 1938 bathroom remodel?
MS: There are always surprises with remodels, especially with old houses.
While we knew the tile on the walls was embedded in concrete attached to the lathe from working in other areas of our home, we were surprised to find there was nothing under the tub supporting it. It was more of an apron that was very much being supported by the plaster and tile that encased it.
It weighed a ton, and sadly, the only way we could get it out was to break it.
TOA: What are your reactions to how the bathroom transformation project turned out?
MS: I absolutely love it. My family tells me I am extra because I like everything to have a lot of detail. I think I earned that title here and have demonstrated that even small bathrooms can be exceptional spaces.
We have had lots of compliments from everyone we’ve shared the transformation with. My husband gets the credit for doing all of the work. He’s very talented.
TOA: What advice do you have for someone going through a similar project?
MS: Prepare to compromise. The tile we ended up with was not the first choice for either of us, but it turned out beautifully.
You will come across problems that require solutions. Take those opportunities to think outside the box.
For example, we thought we would be using the drawers in the counter cabinet as storage.
We knew the light switch was in the way, and we planned to move it, but could not because there just was no extra play in the length of the wire to do so. That meant that we had to cut down the depth of the cabinet, eliminating the drawers. We decided to make both drawer fronts flip down and added a shelf.
Now one space is for my flat iron, which has worked out great, and the other is for things we use every day that I just don’t want sitting out on the counter. It turned out to be an unexpected functional win for us.

TOA: Thank you, Michelle. Your bathroom looks fabulous!
Wondering How New Tile and Cabinets Might Transform Your Dated Bathroom?
Let us know, and we can share ideas similar to this one.
If you are in Fort Myers, do ask for Michelle Slobodzian during weekday hours. She'll happily answer your questions and offer beautiful suggestions that are sure to transform your space while retaining the character and charm it has.
Thank you for reading.
