

Frequently Asked Questions About Grout
Posted by TOA's Blog Team on Sep 27th 2024
As a one-stop-shopping tile installation resource, the Tile Outlets of America staff is frequently asked questions about grout.
In this article, we address those grout questions. If yours isn't listed, please let us know in the comments so we can include it.
Tile Outlets of America's Most Frequently Asked Questions About Grout
What are grout joints?
Grout joints are the spaces you see between the tiles.
Ceramic and porcelain tile is man-made and may have slight inconsistencies in size. Grout joints hide those inconsistencies. They allow an installer to lay a level floor depending on how well the the substrate has been prepared and the quality of the tile being installed.
In addition to allowing a tile installer to minimize tile variations, proper grout joints ensure sufficient room for tile to adjust to building movement and thermal expansion.
Grout joints are an essential part of your tile installation.
What are the different types of grout available?
As we described in Why You Need Grout When You Install Tile and Stone, there are three categories of grout to choose from:
- Sanded grout is ideal for large grout joints - anything 1/8” of an inch or greater (except for marble which sanded grout will scratch).
- Unsanded grout is ideal for smaller grout joints that measure 1/8” of an inch or less.
- Epoxy grout is ideal for counter tops, outdoor patios, pool deck and water line pool tile.
The sanded and unsanded grout available at Tile Outlets of America are polymer-modified grouts which reduce water absorption and increase tensile strength and flexibility.
>> See Specifying the Right Grout for the Job
How do you determine the right grout space?
According to the Tile Council of North America, the relevant standard in the ANSI manual about grout joint size is not specific because you need to consider other parameters in addition.
ANSI A108.02, Section 4.3.8 - Nominal centerline of all joints should be straight and of even width with due allowances for hand-molded or rustic tiles.
Those other parameter to consider include:
- How much variation in size do you notice from tile to tile?
- What kind of edges does the tile have? (e.g., "hand-molded" vs. rectified)
- How large is the tile? (larger tile tends to have more inherent warpage)
- Is the surface scratchable? (e.g., marble is)
- Where will you install the tile? (e.g., larger grout lines can provide more traction which can be a plus on floors)
- How level is the installation surface?
Determining the right grout space is a combination of guidelines and personal preference. For example, only a rectified tile can have a grout joint that is 1/8” or smaller.
>> See What is Rectified Tile and Why Does It Matter for Your Tile Installation?
However, there is no metric to apply to figure what size grout joint an 18x18 tile should have. It’s personal preference whether your joint is 3/16” or 3/8”.
Keep in mind that the tighter the grout joint, the more noticeable variations from tile to tile will be.
Be sure to carefully read the grout manufacturer specifications as they relate to the specific tile you are installing.
We also recommend following tile installation guidelines detailed in the TCNA Handbook for Ceramic, Stone and Glass Tile Installation.
What are best practices for grouting?
Definitely read the grout manufacturer instructions and specifications and follow them.
A common mistake is to add too much water to make it easier to work with. Unfortunately when excess water is added, the color is diluted. Most manufacturers recommend approximately ½ gallon of water to Polymer Grouts. Grout is supposed to be thick; you want a peanut butter consistency.
It is important to measure out the water so you know exactly how much water you used for each 25 lb bag when doing a large job. This will allow for consistent color throughout the job, too.
Once mixed thoroughly, you need to allow the grout to slake for 5-10 min and then remix. This allows the water to completely penetrate the dry mixture so you get a uniform color.
A good rule of thumb is to try to start and stop new batches of mix in inconspicuous places or a doorway in case the color is not exact.
Grouting is really pretty simple when it’s done correctly, it is also very easy to mess up if you don’t read the instructions.
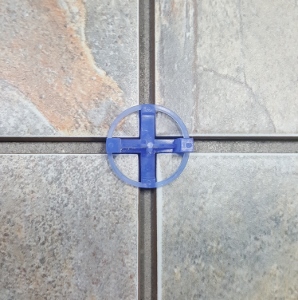
How do spacers fit in?
Spacers are fairly simple. They keep your grout lines straight and consistent by ensuring that each tile is set exactly the same space apart.
There are many different types of spacers to choose from; they all have the same basic function. One of our favorites is the Tavy Spacer pictured below. This spacer sits on top of the tile for easy removal and is open on the top to make sure when you do a corner that the tile is pushed in firmly to the spacer to allow for a nice even joint.
Why does grout get streaky when it dries?
Grout that has dried streaky or splotchy has been over-washed in some areas. This can occur during grout clean up, when you use a wet sponge to clean the excess grout off the tile and more water is used in one area than another.
It’s possible to darken the lighter areas with an enhancing sealer to match, however it may be necessary to have the grout stained to get a consistent color.
![]()
Why has my dark grout color dried much lighter than expected?
Color variations especially with dark grout colors can happen when the grout has been over-watered or over-washed.
- Over-watering is the use of too much water when mixing grout. Grout is designed to be mixed with a finite amount of water; it should be mixed to a peanut butter like consistency.
- Over-washing is the use of too much water during clean up. The most common is cause is the sponge not being rung out properly. After grouting, use a damp sponge to clean the tile.
If too much water is used to mix the grout or too much water used to clean it up, the color becomes diluted.
Make sure, too, that your sponges are clean.
The most common fix for these situations is to apply a grout stain. In some cases a color enhancing sealer can be used to achieve the desired color.
Why does my colored grout have a whitish haze-like residue on it that I can’t get off?
A whitish residue on colored grout is typically caused by efflorescence. Efflorescence is the result of soluble salts or minerals that dissolve in water and come to the surface during evaporation. This is similar to the white ring found in a glass of water that is left to evaporate. Efflorescence can come from moisture coming up through the cement slab or from the mortar itself.
A good way to minimize the possibility of efflorescence from the slab is to use a vapor barrier or moisture barrier to prevent the transmission of moisture through the slab.
>> See Why Underlayment Matters to a Tile Installation Project
Allowing the thinset or tile mortar to fully cure before grouting will also help prevent efflorescence.
Efflorescence can also occur when the water used to mix grout has a high mineral content. It is not recommended to use well water, hard water or agricultural reuse water to mix grout of thinset.
>> See Understanding Efflorescence aka that Ugly White Powder on Your Tile
Any other advice re: grouting?
Be sure that your thinset has cured at least twenty-four hours before grouting.
If you are installing plank tile, wait seventy-two hours.
Additional Resources with Answers to Questions About Grout
Here are a few additional resources about grout:
- How To Tutorial for Grout details choosing grout, applying grout and cleaning off tile.
Are you ready to tackle a tile or stone installation project? We look forward to seeing you in-store and answering your grout questions.
